Secure Boot
To install CachyOS, Secure Boot has to be off first. Unlike Ubuntu or Fedora, CachyOS doesn’t use shim, a Microsoft-signed bootloader that lets third-party systems boot under Secure Boot. Without it, Secure Boot blocks the CachyOS bootloader before it even starts, so it has to be disabled for installation (CachyOS installation docs).
After installation, it’s possible to re-enable it with your own signing keys. This is how I did that using sbctl.
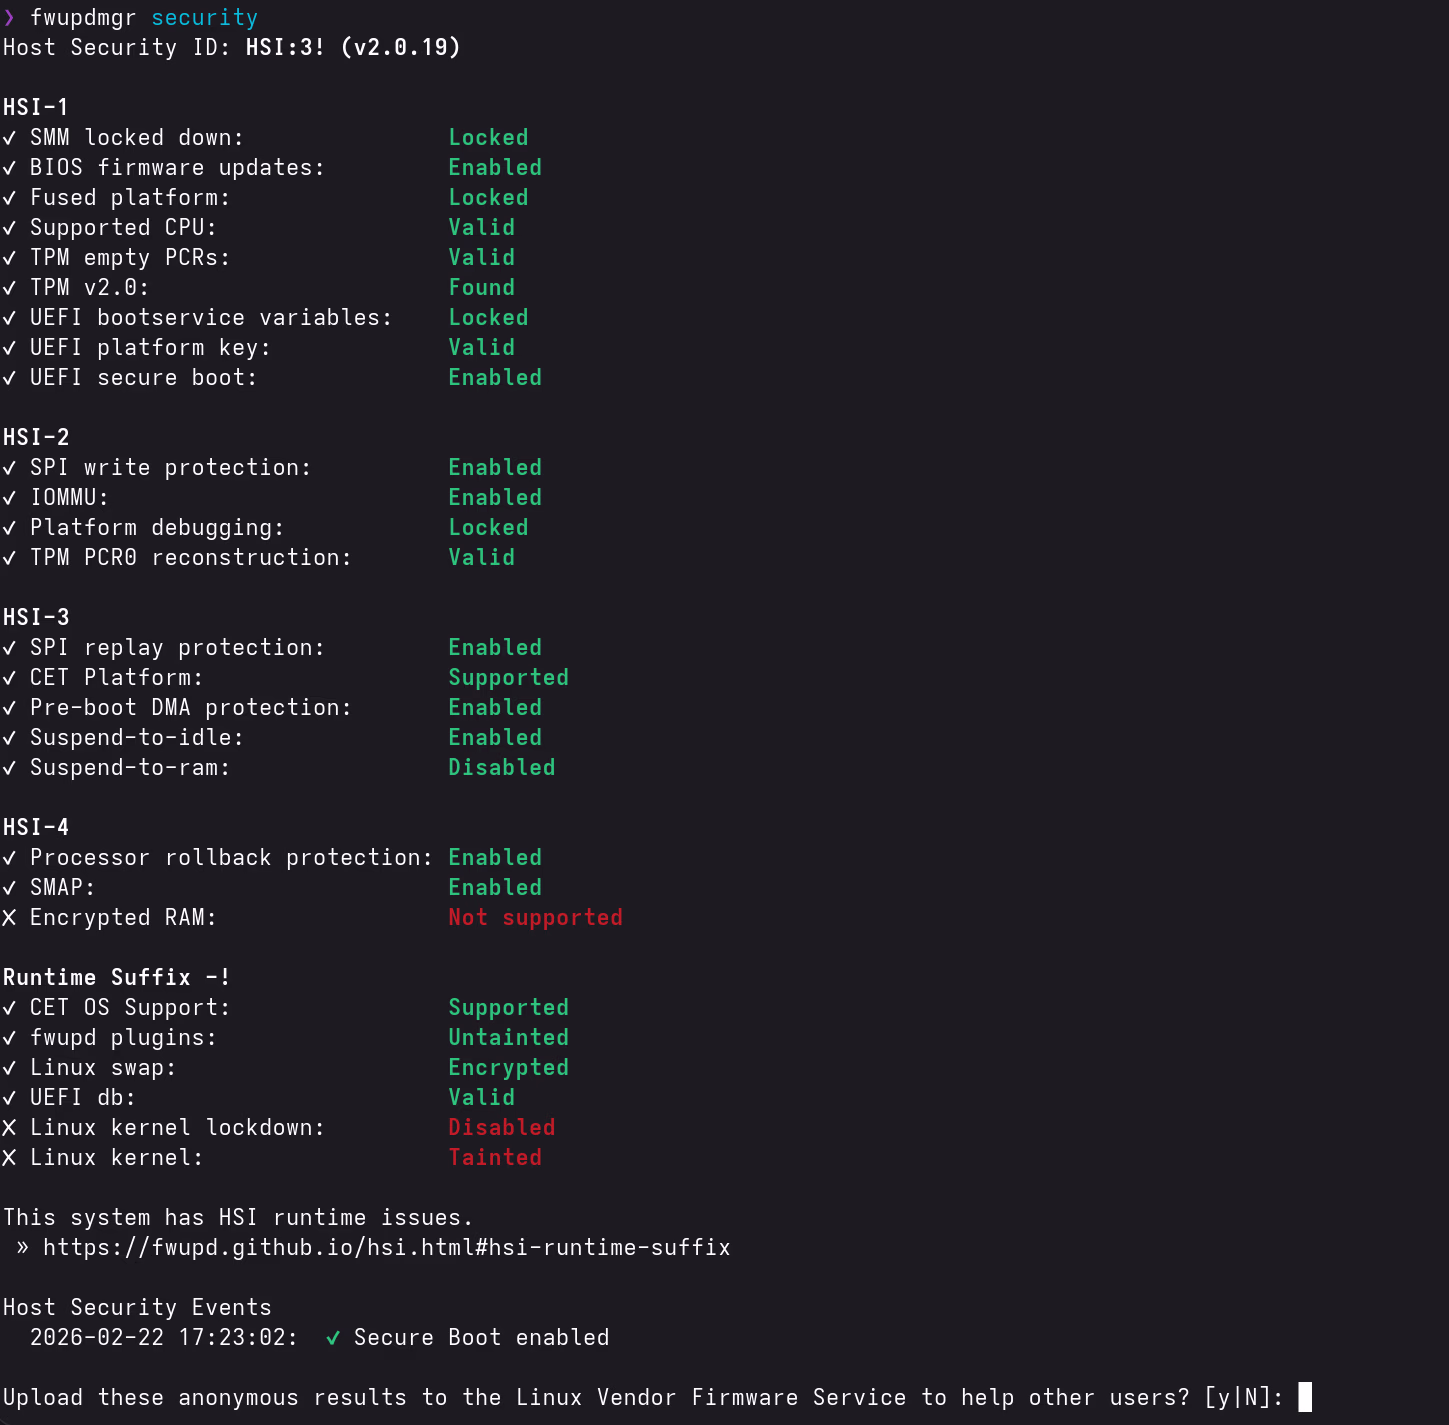
Result: UEFI Secure Boot goes from Fail to Pass after completing this guide. The overall HSI score remains HSI:3! (the Encrypted RAM check at HSI-4 is not supported on this hardware, which prevents reaching HSI:4).
A word of caution first
Secure Boot sounds like a solid security feature, and technically it does what it says: it verifies that the bootloader and kernel were signed by a trusted key. But it’s worth being clear about what “trusted” actually means here.
The Secure Boot ecosystem is controlled by Microsoft. They operate the signing servers, issue the certificates, and decide which bootloaders and shims are allowed into the chain of trust. Most hardware ships with Microsoft’s keys pre-enrolled, which means their keys define what “secure” is on your machine by default. That’s not an independent standard; it’s a vendor-controlled list.
The --microsoft flag in step 3 illustrates this directly: even with your own custom keys, you still have to include Microsoft’s UEFI CA certificates, or your GPU firmware won’t load. Their keys are structurally embedded in how the hardware works.
Does that make Secure Boot useless? No. Signing your own bootloader and kernel with keys you control does meaningfully raise the bar against certain attacks (evil maid, tampered bootloader, etc.). But as a Linux user you should keep a sense of perspective: this isn’t some neutral, independent security standard. It’s a Microsoft-controlled gate with an asterisk attached. Set it up if it makes sense for your threat model, don’t stress about it if it doesn’t, and don’t let the HSI score turn into a goal in itself.
Security Report Context
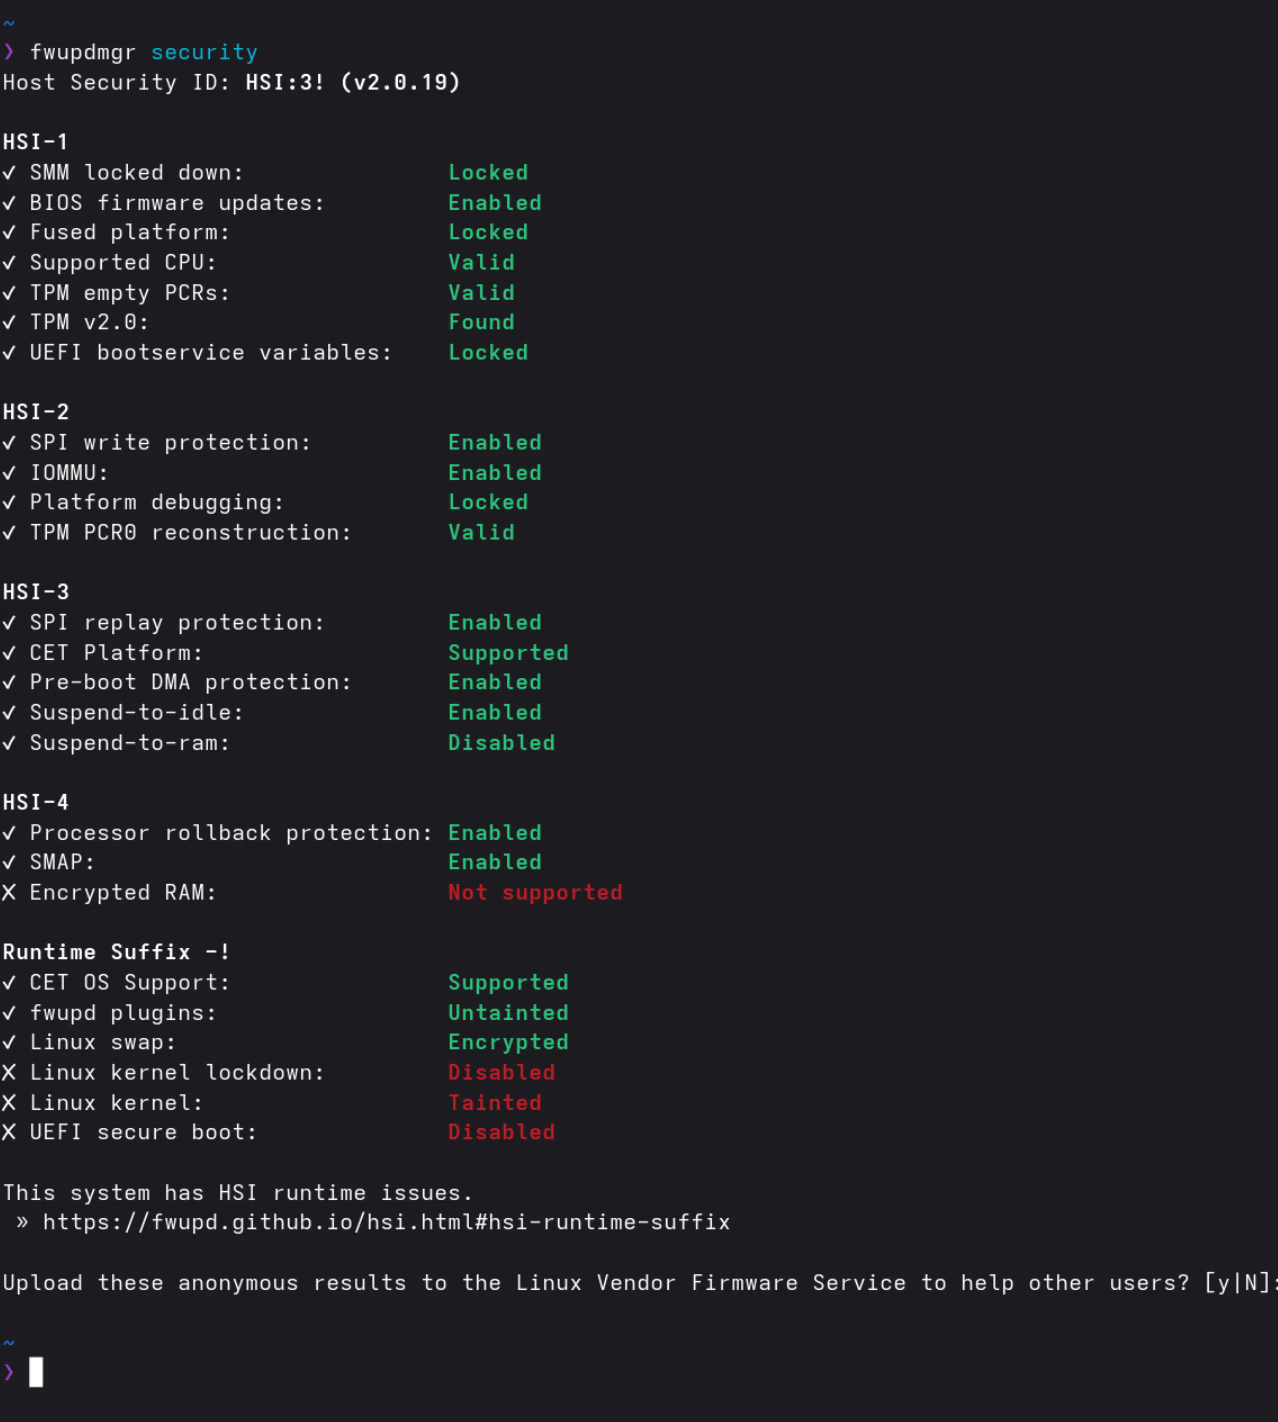
Running fwupdmgr security shows what passes and what doesn’t. After enabling Secure Boot, the remaining failures on this hardware are:
| Test | After this guide | Reason |
|---|---|---|
| UEFI Secure Boot | ✓ Pass | Fixed by this guide |
| Encrypted RAM (HSI-4) | ✗ Not Supported | Hardware limitation: Ryzen AI 9 HX 370 does not implement AMD SME/TME |
| Linux Kernel Verification | ✗ Tainted | Proprietary NVIDIA driver permanently taints the kernel (expected) |
| Linux Kernel Lockdown | ✗ Not Enabled | Requires kernel lockdown mode, not covered here; conflicts with proprietary modules |
How It Works
Instead of the shim → MOK → kernel chain that many distributions use, sbctl enrolls custom Secure Boot keys directly into the UEFI firmware. The bootloader and kernel EFI images are then signed with those keys. No shim or MOK Manager needed.
sbctl also ships with a pacman hook that automatically re-signs all registered EFI binaries after kernel or bootloader updates, so it’s not something you have to think about after the initial setup.
Installation
sudo pacman -S sbctlStep 1: Enter UEFI Setup Mode
Setup Mode is a UEFI state where no Secure Boot keys are enrolled yet, which allows new ones to be added. You need to get into this state before creating keys.
Reboot into the ASUS UEFI:
systemctl reboot --firmware-setupIn the ASUS UEFI (press F7 for Advanced Mode if needed):
- Go to the Security tab
- Select Secure Boot
- Set Secure Boot Control to Enabled
- Open Key Management
- Select Clear Secure Boot Keys (or Reset to Setup Mode if available)
- Confirm and Save & Exit (F10)
After rebooting into CachyOS, verify Setup Mode is active:
sudo sbctl statusExpected output:
Installed:    ✗ sbctl is not installed
Owner GUID:   <your-guid>
Setup Mode:   ✗ Enabled
Secure Boot:  ✗ Disabled
Vendor Keys:  none
Setup Mode showing Enabled confirms the UEFI is ready for key enrollment. The ✗ symbols aren’t errors here; they just mean the keys haven’t been set up yet, which is exactly where we want to be at this point.
Step 2: Create Keys
sudo sbctl create-keysStep 3: Enroll Keys
This enrolls the custom keys into the firmware, including Microsoft’s UEFI CA certificates. The --microsoft flag is required on ASUS hardware; without it, option ROMs (GPU firmware) and other UEFI drivers signed by Microsoft refuse to load. I was a bit hesitant about including Microsoft’s certificates here, but without them the system won’t boot properly.
sudo sbctl enroll-keys --microsoftStep 4: Sign EFI Binaries
The signing process differs slightly depending on your bootloader.
systemd-boot
Sign all EFI binaries and register them in sbctl’s database. The -s flag is important; it ensures files are automatically re-signed after future updates:
sudo sbctl verify
sudo sbctl-batch-sign
sudo sbctl verify
All entries should show ✓. If any show ✗, sign them individually:
sudo sbctl sign -s /path/to/unsigned.efiCachyOS uses systemd-boot-update.service to update the systemd-boot binary. This runs outside the standard sbctl hook, so the source binary needs to be signed explicitly to ensure it’s re-signed on every bootloader update:
sudo sbctl sign -s -o /usr/lib/systemd/boot/efi/systemd-bootx64.efi.signed \
  /usr/lib/systemd/boot/efi/systemd-bootx64.efi
Limine
Limine handles its own signing process and doesn’t require kernel image signatures:
sudo limine-enroll-config
sudo limine-update
Step 5: Enable Secure Boot
Reboot into the ASUS UEFI again:
systemctl reboot --firmware-setup- Go to Security → Secure Boot
- Set Secure Boot Control to Enabled
- Confirm the keys are present under Key Management (DB, KEK, PK should all be populated)
- Save & Exit (F10)
Verification
After rebooting, this is what things look like:
sudo sbctl statusInstalled: ✓ sbctl is installed
Owner GUID: <your-guid>
Setup Mode: ✓ Disabled
Secure Boot: ✓ Enabled
Vendor Keys: microsoft
fwupdmgr securityThe UEFI Secure Boot line under HSI-1 should now show Enabled. The overall score remains HSI:3! (Encrypted RAM at HSI-4 is not supported on this hardware, a hardware limitation unrelated to this guide).
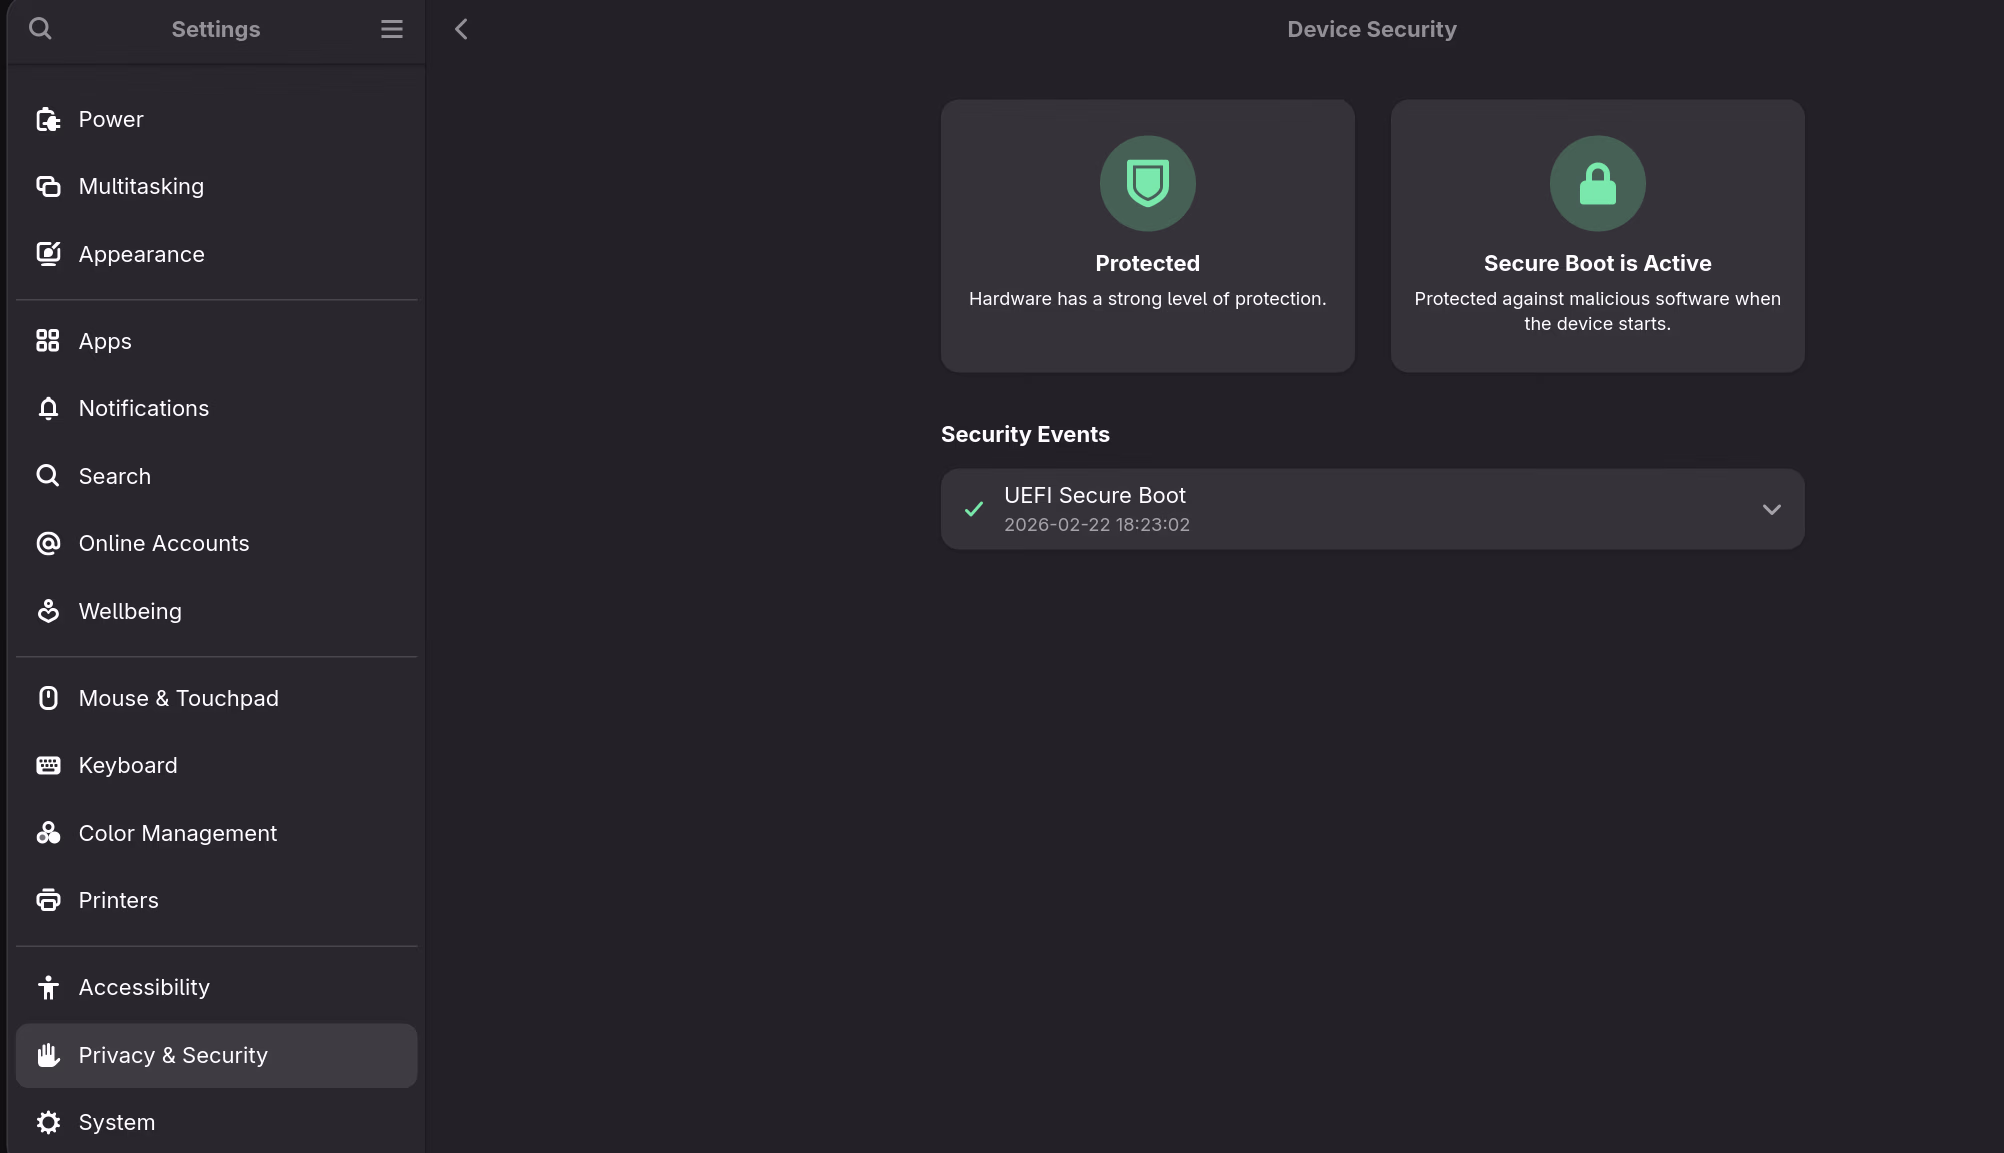
GNOME Settings → Privacy & Security → Device Security also confirms it:
NVIDIA and Kernel Updates
UEFI Secure Boot only verifies the bootloader and kernel EFI image. The NVIDIA driver is loaded as a DKMS module by the kernel. In this configuration, the kernel does not enforce module signatures, so the NVIDIA module continues to work but the kernel is marked as tainted. Signing NVIDIA modules is therefore outside the scope of this guide.
Those who want to cryptographically enforce kernel modules must sign NVIDIA modules with the same key or avoid the proprietary driver.
After a kernel update, pacman triggers both:
- sbctl’s hook → re-signs the new kernel EFI image
- DKMS → rebuilds NVIDIA modules for the new kernel
No manual intervention needed after updates.
Kernel taint: The proprietary NVIDIA driver will continue to taint the kernel. This shows as
Linux Kernel Verification: Taintedin the HSI report. This is expected; it means non-open-source code is loaded, not that the system is compromised.
Remaining HSI Failures Explained
Encrypted RAM (HSI-4)
Not fixable on this hardware. The Ryzen AI 9 HX 370 does not support AMD Secure Memory Encryption (SME) in the mode fwupd checks for. This is a hardware capability limitation, not a configuration issue.
Linux Kernel Lockdown
Kernel lockdown can be enabled by adding lockdown=integrity to kernel parameters. However, lockdown restricts unsigned kernel modules and certain privileged operations, and the proprietary NVIDIA driver would break under lockdown mode. Not something I’d recommend for day-to-day use on this hardware.
Linux Kernel Verification (Tainted)
Caused by the proprietary NVIDIA driver. Can’t be resolved while using proprietary NVIDIA drivers. Not a security vulnerability.